How to install Nest outdoor camera – tips and hints that may help you
Are you looking to enhance the security of your home? The Nest Outdoor Camera might be just what you need. This innovative camera is designed to withstand the elements while providing you with clear and reliable outdoor surveillance. Whether you’re a tech-savvy guru or a beginner, this step-by-step guide will help you install your Nest Outdoor Camera in no time.
First things first, make sure you have all the necessary equipment. In addition to the Nest Outdoor Camera itself, you’ll need a Wi-Fi connection, a power outlet, and a smartphone or tablet with the Nest app installed. These are essential for setting up and controlling your camera.
Next, find the perfect spot for your camera. Consider the areas you want to monitor and ensure there’s a clear line of sight. The Nest Outdoor Camera offers a 130-degree wide-angle view, so choose a location that covers the desired area effectively. It’s also a good idea to use the included wall mount and bracket for secure and stable placement.
Now it’s time to connect your camera. Open the Nest app on your smartphone or tablet and follow the on-screen instructions to add your camera to your Nest account. Make sure your camera is powered on and within range of your Wi-Fi network. The app will guide you through the setup process and help you connect your camera to Wi-Fi.
Once your camera is connected, you can customize its settings to fit your needs. The Nest app provides you with a range of options, including activity zones, notifications, and video quality. Take advantage of these features to optimize your camera’s performance and minimize false alerts.
With your Nest Outdoor Camera successfully installed, you can now enjoy peace of mind knowing that your home is protected. Keep in mind that these hints and tips are just the beginning. Take some time to explore the full range of features and capabilities that the Nest Outdoor Camera offers. Your home security journey has only just begun!
Prepare the Necessary Tools
Before you start the installation process for your Nest Outdoor Camera, make sure you have the following tools and equipment ready:
- A Nest Outdoor Camera
- A stable internet connection
- A smartphone or tablet with the Nest app installed
- A ladder or step stool
- A power drill and drill bits
- An extension cord (if the power outlet is far from the camera’s location)
- Mounting screws and anchors
- A screwdriver or power screwdriver
- A level
These tools will help you successfully install your Nest Outdoor Camera, ensuring it is securely mounted and connected to power. If you need help or have any questions during the installation process, refer to the Nest app for additional tips and hints.
Choose the Perfect Location
When installing your outdoor camera, it’s important to find the perfect location that provides the best view and coverage. Here are some helpful hints and tips to help you choose the ideal spot:
1. Assess your surroundings: Take a look at your outdoor space and identify areas that are vulnerable or prone to security risks. This could be entrances, windows, or blind spots where intruders could potentially enter unnoticed.
2. Consider camera placement: Think about where the camera should be installed to achieve the best view. Ideally, it should be positioned high enough to capture a clear and wide-angle shot of the area you want to monitor.
3. Evaluate lighting conditions: Take into account the lighting conditions in your chosen location. Ensure that there is adequate lighting for the camera to capture clear images, especially during nighttime.
4. Check Wi-Fi signal strength: Your Nest outdoor camera requires a stable Wi-Fi connection to function properly. Make sure the chosen location has strong Wi-Fi signal strength to ensure reliable video streaming and alerts.
5. Weatherproofing considerations: Verify that the location you choose is weatherproof or protected from harsh weather conditions. The Nest outdoor camera is designed to withstand various weather elements, but placing it in a covered area can help extend its lifespan.
By following these tips and carefully selecting the location for your Nest outdoor camera, you can ensure optimal performance and enhanced security surveillance for your home or property.
Mount the Camera Base
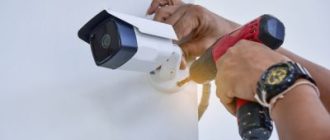
Before you start installing your Nest Outdoor Camera, it’s important to properly mount the camera base. Here are a few tips to help you:
| 1. | Choose a location: | Find a suitable location for the camera base. It should have a good view of the area you want to monitor. |
| 2. | Prepare the mounting surface: | Make sure the surface where you’ll be mounting the camera base is clean and dry. This will ensure a secure installation. |
| 3. | Mark the holes: | Use a pencil or marker to mark the holes where you’ll be mounting the camera base. Double-check the alignment to ensure accuracy. |
| 4. | Drill pilot holes: | Using the appropriate size drill bit, drill pilot holes at the marked locations. This will help prevent the surface from cracking or splitting when you install the screws. |
| 5. | Secure the camera base: | Line up the holes on the camera base with the pilot holes and insert the screws provided. Use a screwdriver or drill to tighten the screws until the camera base is securely attached to the mounting surface. |
Following these steps will ensure a proper installation of the camera base for your Nest Outdoor Camera, giving you peace of mind and a clear view of your outdoor space.
Connect and Route the Cable
Once you have chosen the ideal location for your Nest Outdoor Camera, it’s time to connect and route the cable. This step is crucial for ensuring a secure and reliable connection for your camera.
Here are some helpful tips and hints to guide you through the process:
| 1. Before connecting the cable, make sure that the camera is turned off. | 1. Start by identifying the best route for the cable. Avoid areas with potential interference or obstructions. |
| 2. Carefully connect the cable to the camera and ensure it is securely inserted. | 2. Use cable clips or adhesive hooks to route the cable along the desired pathway. This will help keep it organized and protected. |
| 3. Plan the length of the cable carefully to avoid any excess that may cause tangling or become an eyesore. | 3. If you need to extend the cable, make sure to use quality extension cables that are compatible with the Nest Outdoor Camera. |
| 4. Once the cable is connected and routed, gently push the excess cable into the wall or use cable management accessories to keep everything neat and tidy. | 4. It’s a good idea to test the camera’s connectivity before finalizing the cable installation to ensure it’s working properly and positioned correctly. |
Following these steps will help you connect and route the cable for your Nest Outdoor Camera efficiently and effectively.
Attach the Camera to the Base
Now that you have successfully installed the Nest Outdoor Camera onto the wall, it’s time to attach the camera to the base. This step is crucial as it ensures that your camera is securely mounted and ready to capture high-quality footage.
To attach the camera to the base, follow these simple steps:
- Place the camera onto the base with the lens facing forward and the base mount holes aligned.
- Slide the camera downwards until you hear a click sound, indicating that the camera is securely attached.
- Make sure the camera is level and adjust it if necessary.
- Tighten the screw on the base to secure the camera in place.
Keep in mind the following tips and hints:
- Double-check that the camera is securely attached to the base to avoid any accidents or damage.
- If the camera feels loose, try adjusting the position or retightening the screw.
- Ensure that the camera is level to get the best angle of view.
- If needed, use a level tool to assist you in checking the camera’s alignment.
Attaching the camera to the base is a straightforward process that can be easily completed with the help of these instructions. Take your time, follow the steps carefully, and soon you’ll have a fully functional Nest Outdoor Camera installed in your desired location!
Adjust the Camera Angle
Once you have installed your Nest Outdoor Camera, you may need to adjust the camera angle to ensure optimal coverage. Follow these steps to help you adjust the camera angle:
- Start by launching the Nest app on your mobile device.
- Select the camera you installed from the list of devices.
- Tap on the “Settings” icon.
- Choose “Camera settings” from the menu that appears.
- Scroll down and select “Adjust camera angle”.
- A live view from the camera will appear on your screen.
- Use your finger to drag the camera’s view up, down, left, or right.
- As you adjust the camera angle, you will see the view change in real-time on your screen.
- Keep adjusting until you have the desired angle and coverage.
- Tap on “Save” to save your changes.
Here are some additional tips and hints to help you adjust the camera angle effectively:
- Consider the areas you want the camera to cover, such as entryways or vulnerable areas of your property.
- Ensure the camera is positioned high enough to capture a clear view without any obstructions.
- Experiment with different angles to find the best position for your camera.
- Regularly check the camera’s view to make sure it is still capturing the desired areas.
By following these steps and utilizing the tips mentioned, you can ensure that your Nest Outdoor Camera is properly adjusted to provide the best coverage and security for your home.
Connect the Camera to the Power Source
To install your Nest Outdoor Camera, you will need to connect it to a power source. Follow these steps to ensure a successful installation:
- Locate a power outlet within close proximity to where you want to install the camera.
- Make sure the camera’s power cable is long enough to reach from the outlet to the camera’s mounting location.
- Plug the camera’s power cable into the power outlet.
- If necessary, use cable clips or other accessories to securely fasten the power cable along the wall or other surfaces to prevent tripping hazards or damage.
- If your camera comes with a power adapter, make sure it is properly connected to the power cable and the camera.
Connecting your camera to a stable power source ensures uninterrupted operation and allows you to benefit from all the features it has to offer. If you need further assistance, refer to the provided Nest installation guide or contact the Nest helpline for additional support.
Configure the Camera Settings
Once you have successfully installed your Nest Outdoor Camera, it is important to configure the camera settings to ensure optimal performance. Here are some hints to help you set up your camera:
1. Position your camera: Find the perfect outdoor location where you want to install your Nest camera. Make sure it is placed in a spot that provides a clear view of the area you want to monitor.
2. Connect to your Wi-Fi network: Use the Nest app to connect your camera to your Wi-Fi network. Make sure you have a strong and stable Wi-Fi signal in the area where you install the camera to avoid any connectivity issues.
3. Adjust camera settings: Use the Nest app to adjust your camera settings according to your preferences. You can enable features like motion detection, night vision, and activity zones to enhance the camera’s performance.
4. Set up notifications: Configure your camera settings to receive notifications on your smartphone or tablet whenever the camera detects motion or any other activity. This will ensure that you never miss any important events or incidents captured by the camera.
5. Test and troubleshoot: After configuring the camera settings, it is important to test the camera to ensure it is functioning properly. If you encounter any issues, consult the Nest app’s troubleshooting guide or contact Nest support for further assistance.
By following these steps, you can configure your Nest Outdoor Camera to meet your specific requirements and enjoy the benefits of having a reliable and efficient outdoor surveillance camera.
Connect the Camera to Your Wi-Fi Network
Connecting your Nest outdoor camera to your Wi-Fi network is an essential step to ensure seamless monitoring and performance. Here are some hints and tips to help you with the process:
1. Getting started:
Before you begin, make sure you have a stable Wi-Fi connection and the camera is within range of your network. Also, ensure that your camera is fully charged or connected to a power source.
2. Start the setup process:
Open the Nest app on your smartphone and sign in to your account. Tap on the “Add” button to start the setup process for your camera.
3. Follow the on-screen instructions:
The Nest app will guide you through the setup process step by step. Make sure to carefully follow the instructions given on the screen. You may need to enter your Wi-Fi network password during this step.
4. Help the camera connect:
Position your camera so that it is close to your Wi-Fi router during the setup process. This will ensure a strong signal and a smooth connection. Once the camera is connected to your Wi-Fi network, you can move it to its desired location.
5. Test the connection:
After the camera has successfully connected to your Wi-Fi network, it’s a good idea to test the connection. Go to the Nest app and check if you can view the live feed from your camera. If everything looks good, you can proceed to mount the camera outdoors.
By following these tips and using the Nest app, you can easily connect your outdoor camera to your Wi-Fi network and start monitoring your home with peace of mind.
Download and Install the Nest App
If you want to install and set up your Nest Outdoor Camera, the first step is to download and install the Nest app. This app will be your outdoor camera’s main control hub, allowing you to view and manage your camera’s settings from your smartphone or tablet.
To download the Nest app, open the app store on your device (whether you’re using an iPhone or an Android device) and search for “Nest.” Once you find the Nest app, tap the “Download” or “Install” button to start the download process. The app will be downloaded and installed on your device automatically.
If you need further assistance with downloading and installing the Nest app, you can visit the official Nest support website, where you will find helpful tips and guides to help you through the process. They offer step-by-step instructions and troubleshooting tips to ensure that you can easily get the app up and running on your device.
Register and Set Up Your Nest Account
To install and set up your Nest Outdoor Camera, you will need to create a Nest account and complete the registration process. Follow the steps below to register and set up your account:
|
Step 1: |
Visit the Nest website and click on the “Sign Up” button. |
|
Step 2: |
Enter your email address and create a password for your account. Make sure to use a strong and secure password. |
|
Step 3: |
Verify your email address by clicking on the verification link sent to your email. |
|
Step 4: |
Provide additional information such as your name, address, and phone number. |
|
Step 5: |
Agree to the terms and conditions of the Nest service. |
|
Step 6: |
Set up two-step verification for added security. |
|
Step 7: |
Finish the registration process and log in to your Nest account. |
If you need any help or have any questions during the registration process, there are tips and hints available on the Nest website that can guide you through the installation process. The Nest support team is also available to assist you with any troubleshooting or technical issues that you may encounter.
Add the Camera to Your Nest Account
Once you have successfully installed your Nest Outdoor Camera, the next step is to add it to your Nest account. This will allow you to access and control your camera remotely using the Nest app.
To add the camera to your Nest account, follow these steps:
| Step 1: | Open the Nest app on your smartphone or tablet. |
| Step 2: | Tap on the “+” button to add a new device to your account. |
| Step 3: | Select “Camera” from the list of options. |
| Step 4: | Follow the on-screen instructions to connect the camera to your Wi-Fi network. |
| Step 5: | Once the camera is connected, you will be prompted to give it a name. Choose a descriptive name that will help you easily identify the camera. |
| Step 6: | Finally, you can customize the camera settings according to your preferences. This includes adjusting the motion detection sensitivity, setting up notifications, and enabling or disabling features such as night vision. |
These hints and tips should help you successfully add your Nest Outdoor Camera to your Nest account. If you encounter any issues during the process, refer to the Nest documentation or contact their customer support for further assistance.
Test the Camera’s Functionality
Once you have completed the installation of your Nest Outdoor Camera, it is important to test its functionality to ensure that it is working properly. Here are some tips and hints to help you test your camera:
- Make sure that the camera is properly connected to your home’s Wi-Fi network. You can do this by checking the camera’s settings in the Nest app.
- Adjust the camera’s angle and position to ensure that it captures the desired area. You can use the camera’s swivel mount to easily change its orientation.
- Check the camera’s live feed in the Nest app to see if it is displaying a clear and sharp image. If the image quality is not satisfactory, you may need to adjust the camera’s placement or check for any obstructions.
- Test the camera’s night vision capabilities by turning off the lights in the area you want to monitor. The camera should be able to capture clear images even in low-light conditions.
- Try out the camera’s motion detection feature by walking in front of it. The camera should send you notifications or alerts when it detects any motion in its range.
- Check the camera’s two-way audio feature by using the Nest app to speak through the camera’s built-in speaker and listen to the audio through its microphone. This feature is useful for communicating with people near the camera.
- If you encounter any issues or have any questions, refer to the Nest Outdoor Camera’s user manual or contact Nest customer support for further assistance.
By following these steps, you can ensure that your Nest Outdoor Camera is installed properly and functioning as expected, providing you with peace of mind and enhanced security for your outdoor space.
Set Up Additional Camera Features
Once you have completed the installation of your Nest Outdoor Camera, there are additional camera features that you can set up to enhance your outdoor monitoring experience. These features will provide you with valuable hints and tips, helping you optimize the performance of your camera.
Here are some outdoor camera features you can take advantage of:
| Activity Zones | Set up specific areas within your camera’s view to monitor for activity. This can help reduce unnecessary notifications and focus on important areas, such as the entrance to your home. |
| Familiar Faces | Tell your camera to recognize familiar faces and receive special alerts when they are detected. This can be useful to keep track of important people coming and going from your property. |
| Noise and Light Settings | Adjust the sensitivity of your camera to noise and light levels. This can help avoid unnecessary notifications caused by minor disturbances or changes in lighting conditions. |
| 24/7 Continuous Recording | Upgrade your camera to enable continuous recording, allowing you to review footage from the past 10 or 30 days. This can provide extra security and peace of mind. |
| Integration with Other Devices | Connect your camera to other smart home devices, such as smart speakers or displays, to access camera feeds with voice commands or view them on a larger screen. |
| Camera Sharing | Grant access to your camera’s feed to trusted individuals, such as family members or neighbors, so they can help monitor your property when you’re away. |
By setting up these additional camera features, you can make the most out of your Nest Outdoor Camera installation. They will provide you with the necessary help and assistance to ensure your camera meets your specific outdoor monitoring needs.
Q&A:
What tools do I need to install a Nest Outdoor Camera?
You will need a power drill, a Phillips screwdriver, a ladder, wire strippers, and a smartphone with the Nest app installed.
Can I install a Nest Outdoor Camera on my own, or should I hire a professional?
You can definitely install the camera on your own. The installation process is straightforward and comes with step-by-step instructions. However, if you don’t feel confident doing it yourself, you can always hire a professional to help you.
How long does it take to install a Nest Outdoor Camera?
The installation process usually takes around 30 minutes to an hour, depending on your level of experience and the complexity of the mounting location.
Do I need to have an existing doorbell for the Nest Outdoor Camera to work?
No, you don’t need an existing doorbell. The Nest Outdoor Camera can be powered by plugging it into an electrical outlet or by using the included power adapter.
Can I use the Nest Outdoor Camera indoors?
Yes, you can use the Nest Outdoor Camera indoors as long as you have a power source nearby. However, it is specifically designed for outdoor use and may not be as effective indoors.

